Infrastructure as code with Pulumi
Introduction
Chances are, if you are using cloud, that you have already scripted your infrastructure using Cloud Formation, Azure Resource Manager or frameworks such as Terraform and Serverless Framework.
When using the the above frameworks you declare your infrastructure via a yaml or json file. However, there are frameworks that permit to do the same with programming languages. For example AWS Cloud Development Kit or the topic of this post Pulumi.
Why use code?
Using code to define infrastructure seems to be splitting opinions a bit, as a fairly recent Hacker news discussion attests.
Personally I used all of the frameworks I mentioned in the introduction, save for AWS CDK. Cloud Formation and Azure Resource Manager can be tedious, but things improve when using Terraform or Serverless Framework.
Pulumi is as easy to use as Terraform or Serverless Framework. Where it differs is, that the experience, when using a modern code editor, becomes a little bit more smooth. For example, code completion helps you to trawl through documentation a bit less often. When needed you can quickly write helper functions in a language you already know. Code reuse is also easy, and you could imagine scenarios where you define standard infrastructure parts and distribute them using a package manager.
Not everything is perfect though. Using code could be a deal breaker for someone without a developer background. The comunity using Pulumi is smaller compared to Terraform’s and then there is the pricing; Pulumi is not free for everyone, but before you dismiss it do check their pricing page. And lastly, some might take issue with the fact that their stack’s metadata is stored somewhere in the cloud, but there is a way around that too.
Defining infrastructure using Pulumi
In the rest of the post we are going to go through defining and deploying a simple statically hosted SPA app with Azure Function backend.
Setting up Pulumi
NOTE: If you are using Windows, I recommend installing everything into WSL. Windows version of Pulumi suffers from some glitches when uploading files to static web site.
First of all let’s start with installing Pulumi. Follow the instructions on this page to install Pulumi.
Next, we need to install a Pulumi language runtime. In this case we are going to use .NET, so you need to install .NET Core SDK.
Now we are ready to configure Pulumi’s access to Azure. Follow the steps here to configure access.
Setting up a new Pulumi project
You don’t need to create a new project for what I am going to describe in the rest of the post, but if you are starting from scratch and wanted to use C#, this is what you would need to do:
pulumi new azure-csharp
This triggers a creation of a C# Pulumi project. The CLI will ask you a few questions, including to login or create an account (free for individual use), and at the end you will have a C# project ready to have code added to it.
The two important files generated by the CLI are Pulumi.stackname.yaml and MyStack.cs. MyStack.cs is where our code goes, while the former defines some properties of the stack such as the Azure region. Note that the region cannot be modified via the yaml file. You will need to destroy the stack and create a new one if you need to change the region.
Again, as mentioned, to run the example we are going to work with in this post you don’t need to create a new project. You will find the instructions on how to deploy the example later in the post.
Defining a Pulumi Deployment
Let’s script and deploy a statically hosted SPA app with Azure Function backend! The full for the Pulumi project and the sample app that I am going to explain is available here. Be aware that MyStack.cs has been renamed to BalthazarStack.cs.
- We need to start with defining an Azure Resource Group and tag it with Pulumi’s project and stack. Tagging resources makes it easier to find them in Azure Portal as Pulumi creates all resources by taking the defined name and appending some random characters to it, which makes it difficult to distinguish different environments:
// Create resource group var resourceGroup = new ResourceGroup("balthazar", new ResourceGroupArgs { Tags = { { "Project", Pulumi.Deployment.Instance.ProjectName }, { "Environment", Pulumi.Deployment.Instance.StackName }, } }); - Next, we need to create a storage account. The storage account will be used both by the Azure Function app and to host the static SPA app. Note how we simply reference resourceGroup variable to get the resource group name:
// Create storage account var storageAccount = new Account("balthazarstrg", new AccountArgs { ResourceGroupName = resourceGroup.Name, AccountReplicationType = "LRS", AccountTier = "Standard", AccountKind = "StorageV2", StaticWebsite = new AccountStaticWebsiteArgs { IndexDocument = "index.html" }, EnableHttpsTrafficOnly = true }); - We also need to define a consumption plan for the Function app:
// Create consumption plan var appServicePlan = new Plan("balthazarappsvc", new PlanArgs { ResourceGroupName = resourceGroup.Name, Kind = "FunctionApp", Sku = new PlanSkuArgs { Tier = "Dynamic", Size = "Y1", } }); - Our aim is not only to define the infrastructure, we will also deploy the Function app. To do so we will zip the output of
dotnet publishand later reference the zip from the Function app:// Create a container for function app deployment blobs var container = new Container("zips", new ContainerArgs { StorageAccountName = storageAccount.Name, ContainerAccessType = "private" });// Create function app deployment blob var blob = new Blob("functionAppZip", new BlobArgs { StorageAccountName = storageAccount.Name, StorageContainerName = container.Name, Type = "Block", Source = new FileArchive("../API/bin/Debug/netcoreapp3.1/publish") });With deployment artifacts ready we can move on to deploy the Function app:
// deploy functions app
var codeBlobUrl = SharedAccessSignature.SignedBlobReadUrl(blob, storageAccount);
var app = new FunctionApp("balthazarapp", new FunctionAppArgs
{
 ResourceGroupName = resourceGroup.Name,
 AppServicePlanId = appServicePlan.Id,
 SiteConfig = new FunctionAppSiteConfigArgs()
 {
     Cors = new FunctionAppSiteConfigCorsArgs()
     {
         AllowedOrigins = new[] { storageAccount.PrimaryWebEndpoint.Apply(s => s.TrimEnd('/')) }
     }
 },
 AppSettings =
 {
     {"runtime", "dotnet"},
     {"WEBSITE_RUN_FROM_PACKAGE", codeBlobUrl},
     {"BookmarkCollectionConnectionString", storageAccount.PrimaryConnectionString}
 },
 StorageAccountName = storageAccount.Name,
 StorageAccountAccessKey = storageAccount.PrimaryAccessKey,
 Version = "~3"
});
Now, you may have noticed there is something going on when defining CORS rules:
Cors = new FunctionAppSiteConfigCorsArgs()
{
 AllowedOrigins = new[] { storageAccount.PrimaryWebEndpoint.Apply(s => s.TrimEnd('/')) }
}
The intent is to allow SPA app to access the Function app, so we want to add the value of storageAccount.PrimaryWebEndpoint, which is the URL of the statically hosted website, to the list of allowed origins. The problem with this value is that it has a trailing ‘/’, whereas to properly configure CORS we need the value without it. In a normal program you’d just manipulate the string and you’d be done. Here however, storageAccount.PrimaryWebEndpoint is not a string, instead it is of type
Output<string>, a wrapper around string. So to manipulate the string we need to use the Apply function to perform the modification.
Another point of interest in the Function app deployment snippet are the AppSettings. For example, you can see that the artifacts to execute are linked to the Function app by defining WEBSITE_RUN_FROM_PACKAGE setting. Defining storage connection string is straightforward too:var codeBlobUrl = SharedAccessSignature.SignedBlobReadUrl(blob, storageAccount); var app = new FunctionApp("balthazarapp", new FunctionAppArgs { ... AppSettings = { {"runtime", "dotnet"}, {"WEBSITE_RUN_FROM_PACKAGE", codeBlobUrl}, {"BookmarkCollectionConnectionString", storageAccount.PrimaryConnectionString} } ... } - All that remains is to deploy the SPA app, since it is a statically hosted site this means we just need to copy the built SPA files into the right spot in the storage account:
// Upload web files
var currentDirectory = Directory.GetCurrentDirectory();
var rootDirectory = Directory.GetParent(currentDirectory).FullName;
var webDistDirectory = Path.Combine(rootDirectory, "Web", "dist");
var files = EnumerateWebFiles(webDistDirectory);
foreach (var file in files)
{
 var uploadedFile = new Blob(file.name, new BlobArgs
 {
     Name = file.name,
     StorageAccountName = storageAccount.Name,
     StorageContainerName = "$web",
     Type = "Block",
     Source = new FileAsset(file.info.FullName),
     ContentType = MimeTypesMap.GetMimeType(file.info.Extension)
 });
}
EnumerateWebFiles is a helper method that traverses a folder and returns all of its content including subfolders, C# makes it easy to define:
private static IEnumerable<(FileInfo info, string name)> EnumerateWebFiles(string sourceFolder)
{
 var ignoredFiles = new[] { ".nojekyll", "config.js" };
 var sourceFolderLength = sourceFolder.Length + 1;
 return Directory.EnumerateFiles(sourceFolder, "*.*", SearchOption.AllDirectories)
     .Select(path => (
         info: new FileInfo(path),
         name: path.Remove(0, sourceFolderLength).Replace(Path.DirectorySeparatorChar, '/')
     ))
     .Where(file => !ignoredFiles.Contains(file.name));
}
The other neat thing to mention is that we used a Nuget package to determine ContentType of each uploaded file on this line:
ContentType = MimeTypesMap.GetMimeType(file.info.Extension) - The SPA has been deployed, but how does it know the API’s URL? The answer is in config.js that we will generate with this code snippet:
// create the web config var configFile = new Blob("config.js", new BlobArgs { Name = "config.js", StorageAccountName = storageAccount.Name, StorageContainerName = "$web", Type = "Block", SourceContent = Output.Format($"window.config = {{ apiBase: \"https://{app.DefaultHostname}/api\" }}"), ContentType = "text/javascript" }); - Lastly lets define an output so we know where the SPA app was deployed to:
public BalthazarStack()
{
 ...
 // Export the app's web address
 this.WebEndpoint = storageAccount.PrimaryWebEndpoint;
}
[Output] public Output<string> WebEndpoint { get; set; }
Deploying Pulumi Stack
To deploy the example just described, clone the source code from here, then execute:
pulumi stack init dev
az login
dotnet publish ../API/API.fsproj
npm run build --prefix ../Web
pulumi config set azure:location <location>
pulumi up
Integrating Pulumi into CD pipeline
Pulumi supports most popular CD systems and offers generic ways to integrate it into a CD not on the list. For my little project I used their Azure DevOps integration. To use Pulumi in Azure DevOps you need to first install their extension.
I decided to have a preview step first, and then, after a manual approval trigger the actual deployment. Before you continue head over to your account at pulumi.com and generate an access token. Store the token value into a variable named PULUMI_ACCESS_TOKEN.
The definition of a preview task looks like this, I placed this step in the build stage of my pipeline definition:
stages:
- stage: build_and_preview
  jobs:
  - job: build_and_preview
    displayName: 'Build and preview deployment'
    steps:
    ...
    - task: Pulumi@1
      displayName: '[Pulumi] preview'
      inputs:
        azureSubscription: 'Azure'
        command: 'preview'
        cwd: "Deployment"
        stack: "fajrvehr/balthazar/test"
      env:
        PULUMI_ACCESS_TOKEN: $(PULUMI_ACCESS_TOKEN)
The deployment step then looks like this:
- stage: deploy
  jobs:
  - deployment: deploy
    displayName: 'Deploy'
    environment: 'BalthazarTest'
    strategy:
      runOnce:
        deploy:
          steps:
          - task: Pulumi@1
            displayName: '[Pulumi] up'
            inputs:
              azureSubscription: 'Azure'
              command: up
              cwd: "$(Agent.BuildDirectory)/drop/Deployment"
              args: "--yes"
              stack: "fajrvehr/balthazar/test"
            env:
              PULUMI_ACCESS_TOKEN: $(PULUMI_ACCESS_TOKEN)
To achieve the manual approval I added na approval step to BalthazarTest environment in Azure DevOps. Azure Devops approvals are beyond the topic of this post, but if you are interested, you can read more about it here.
The full pipeline definition with the above steps is here.
When this pipeline is run, we first have a preview step and I can either check build logs or head over to pulumi.com, to see what the changes are going to be:
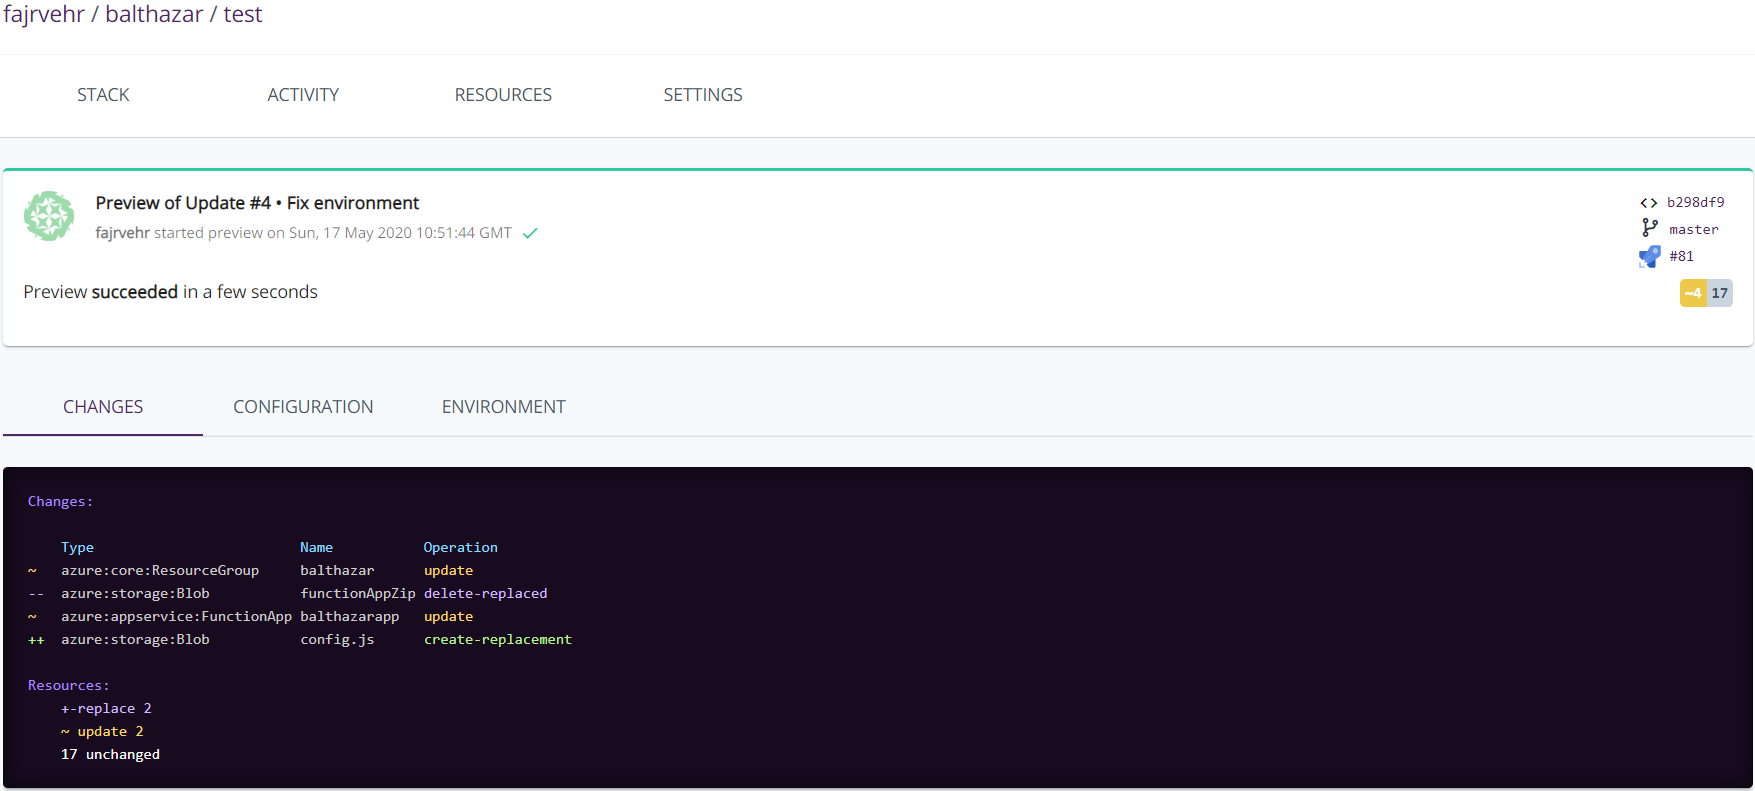 .
.
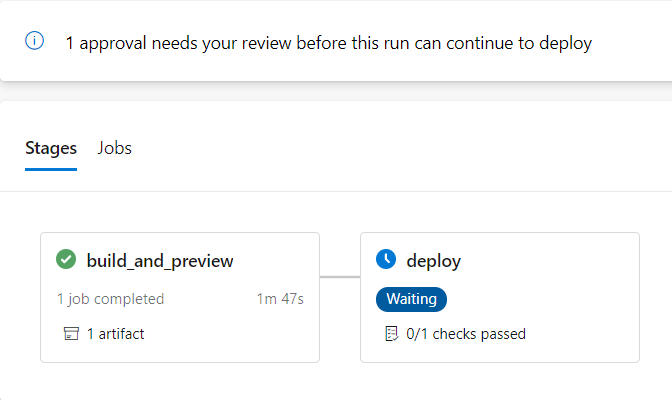
And the deployment will be on hold until I approve it:
 .
.
So?
Pulumi has earned its place in my personal tech stack. It is free for individual use and personally I think it is not too expensive for team use either. The final judgement is up to you though. Do play around with it, perhaps you will like it just like I did.